And Those Who Can’t DIY…Buy? Rolled Magazine Paper Bowl DIY!

IMG_4757

IMG_4776 IMG_4775 IMG_4758  IMG_4754

Rolled Magazine Paper bowl, .99, Goodwill

how to(and other fun crafts): http://doitandhow.com/?s=magazine

Well, not normally in my case, but for .99 at Goodwill, yes.

This was such a find for me.

I love the DIY/Craft look, especially when I don’t actually have to do it myself…so I’m a cheater 😉

I mean, ya know I love a good craft, but I don’t always have the patience skills time.

This looks pretty difficult actually.

I am not sure if someone else made it, and I am going to would never take credit, or if it is store bought.  I don’t see any label on it, but it could have come off… (Detective Jaime at work here, watch out.  She comes out every now and then.)

Either way, it’s fabulous and I can’t wait to display it in the new house I am moving into next month in my FAVORITE area of town.

Since I didn’t actually make this one myself in order to show you how to, I found a lady who did, or at last has a link to how to do it.

So here is my link to a link to create your own rolled up magazine paper basket, and it’s actually two slightly different more fun versions of it.

The blog is www.doitandhow.com, and this is the page with magazine paper projects, including two bowls and one frame.

I’m telling you, if Pinterest was more like this blog, I would be addicted to it just like everyone else.

I couldn’t stop looking at her posts once I found this one.  Each craft and DIY was so cool!

I want to do every one.

LIke now.

One was making a necklace out of an old t-shirt by cutting it up and using the fabric.  I like necklaces!  I don’t like spending money!  I can find plenty of old cheap t-shirts at Goodwill!

Love!

…another was turning old mason jars into cool ones with words on them using a hot glue gun and spray paint.

I have all of those supplies!!!

And on my reactions went….

until I decided to start paying attention in class again 😉  but nevermind that…

good student award here.

So you should check it out and find some cool projects, in addition to the DIY magazine paper bowl one.  Let me know if any of you try it and are successful!!  Looks like so much fun!

Unless you find one at Goodwill first like me that is. 😉

-Jaime

Those Who Can’t Buy, DIY

IMG_4550

IMG_4681

IMG_4688

IMG_4683

 IMG_4687 IMG_4684

original bureau, $14.99, Goodwill

stencil, Michael’s, $10.99

Get it?  It’s cool cause it rhymes…

Anyway.

I have history of buying fixer uppers at Goodwill….and not fixer uppering them…

cough, cough

but times have changed.

And I have fixed up.

The above bureau to be exact.

Whatcha think?

I like it quite a bit.

I started with the white paint.

And then was at Michael’s getting supplies to make something for my new niece Summer Jane, and saw the stencil I used above and knew I had to get it.

The example the stencil packaging had on it was of a bureau just like mine, same exact doors and everything, so I can’t take too much credit for seeing the stencil and thinking of my bureau.

It was pretty much laid out for me by Martha.

Martha Stewart.

I then tossed the idea up of either doing one in the center of each panel door, or two on each, like I have above, kinda.

I went with doing two, and then decided that was ‘two’ much 🙂 and did not do any on the bottom panels.  I think it works.

I’m in love with the stencil.

Adds just the right amount of elegance and whimsy.

And competely recreates the bureau.

I had wanted to do a nice refinishing of the wood, but that was much more work!  Apparently.

Baby steps.

My friend said the wood on top was not a quality wood like the doors to be refinished and would be very difficult.  And I had paint on hand, and then a stencil appeared in my life, so this is what happened.

Happy thrifting and DIY’ing,

-Jaime

Floweraholics Anonymous

Hi.  My name is Jaime.  And I am addicted to flowers.

The first step is ackowledgement they say.

But how am I supposed to kick it if Goodwill keeps providing me with such lovely flowered cover things??

For so cheap??

I don’t know, but its best just not to fight it, I think.

IMG_2390 IMG_2389

Small hanging canvas, .99.  Priced on the spot.  Reasonably:)

Is it not the cutest thing ever??? I ’bout had a heart attack when I picked it up.

This is known as a GBISHA- the ‘Goodwill bargain induced shock heart attack’.

IMG_2376 IMG_2374

Standing Photo album/frame, $2.99.

IMG_2380

IMG_2379

IMG_2384

Hanging Jewelry Organizer, $.99!! The cheapest I have seen them is $9.99.  Anywhere.

IMG_2377

Little blue flowery journal, for my songwriting ways, $.99.

IMG_2369 IMG_2368

Three mason jars, $.49 each,

used to make tealight on water candle holders like this:

IMG_2382 IMG_2381

So pretty!?

Tealights were $2 for 20 at Family Dollar, one of my other favorite places to shop.

They have candles like this on the bar top where I work, and I loved it so much I wanted to copy it at my house.  I knew Goodwill has mason jars a lot, so I popped over to get these, and found them along with all my other great items as well.

Pretty simple:

Just fill the mason jar with water.  Place the tealight on top.

Immediate pretty and romantic ambience.

What I DIDN’T take home:

IMG_2365

This awesome Mossimo from Target (donated, not purchased from Target by Goodwill) striped boatneck pocket shirt for $4.49.

Why you ask?

This:
IMG_2367

Normally, I would buy the shirt/item, get home, and notice the indiscretion.  Somehow I noticed it before I purchased it this time and couldn’t bring myself to buy it.  For the best I guess.  $4.49 more in my pocket.

A GREAT day at Goodwill, I’d say.  I love all my items so much, and do not care how flowery or feminine they are.  I am flowery and feminine and am proud of it.  I may have to change my decor ways someday when I get married…but we’ll see.

Until then….

Thanks for stopping by!

Go out and support your local Goodwills and thrift stores!  They do great work!  (For both our closets, homes, and society 😉

-Jaime

First DIY (that I’m sharing)- Picture Frame Earring Holders And….First Giveaway!!!!

I have found the secret to making earring organizers/holders/hangers by yourself, out of old (but still awesome) picture frames, wire mesh and super glue, and that’s it.  And I am going to share it with you.  You’re welcome.

And trust me, if I can do it, y’all can.

I am common sense challenged in this life, and the littlest hiccup in a project will send me reeling and having no idea what to do.  I have succesfully made three of these and they have been functional on my wall for going on four months now.  I would say that means I did it right.  And I will do my best to explain it to you.

Obviously, you’re going to start with your local Goodwill (or another just as awesome thrift shop) for some old picture frames of your choosing, suiting whatever your individual taste is.

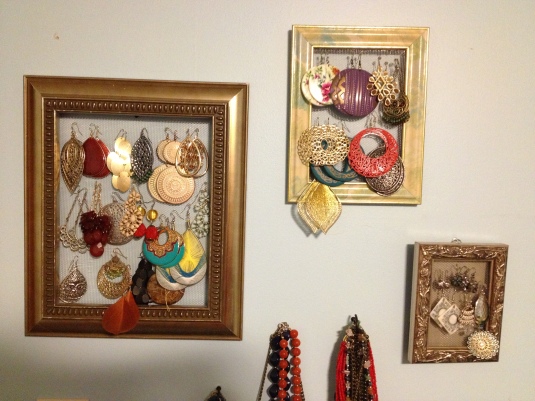
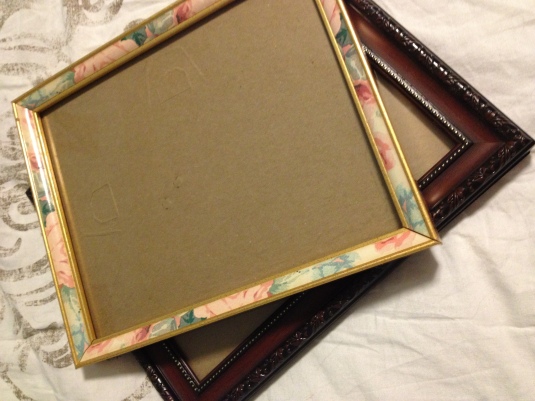
These are the three that I have already turned into earring holders, and I will share my two newest frames, soon to be DIY’d, later in this post:

064

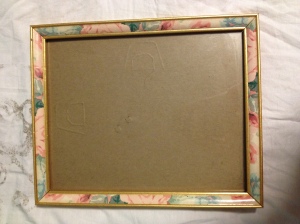
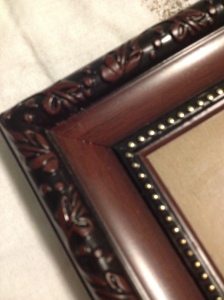
Did you think I wouldn’t give close ups?

065 066 067

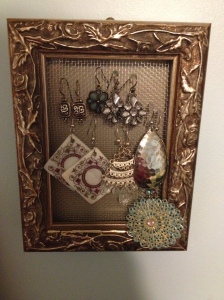
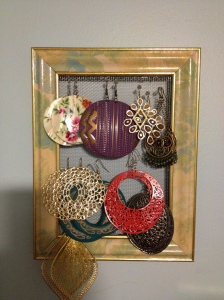
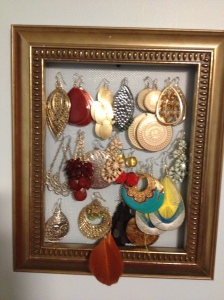
They go from smaller to larger left to right, although it is probably hard to tell.  They are 3×5, 4×6, and 8×10.  The one on the left stands as well, but I choose to hang it cause I don’t have the largest dresser top.

And thank you, I know, I have an earring problem.  I love jewelry.  I’m a girl.  Duh.

Some of my necklaces hanging on hooks below the frames…

063

So that is the great thing- there are so many different style frames out there to choose from, that it completely changes the style and look of each item without having to do any additional work except picking it up off of the shelf.  Pretty easy if you ask me.  You will see the three that I have are all different but each one great in itself.  But depending on your style, you could go industrial looking, plain wood, colorful, vintage…the options are really endless.

So the first step is done, you have found your awesome beautiful frames that will look great hanging or standing somewhere in your I’m sure lovely bedroom (or closet for those really lucky ladies), now you need to buy wire mesh for the hanging part.  I bought literally window screening at my local hardware store, the smallest amount they sold.  I’m not a factory…  They had two options, matte or shiny.  I chose the shiny.  Matte silver tends to just look dirty, and no one wants their earrings hanging on something that looks like its covered in dirt.

Choose said frame that you would like to start with, take out everything from the frame- glass, cardboard,etc, all you need is the outer frame piece, and place the wire mesh over the back and cut out a piece big enough to fit.  Pretty basic.  I think we all started doing similar things in Kindergarten/first grade.

THEN, you take the hot glue gun and put glue around the edge (on the back of the frame where you can’t see), and then press the wire mesh down into the hot glue.  I used my fingertips to press, you have to do this because the wire mesh doesn’t grab to the glue easily because it is so holy.  Then, voila!  You wait for it to dry and then you hang your earrings on it.  And I hung them on the wall with thumb tacks.  Pretty simple.  If you want to stand the frame up, then you can put the back back in that will make it stand, otherwise, no backing is necessary and this leaves more room for the hooks to go in.

If something can’t hang on my wall with thumb tacks, I don’t buy it.  Period.

I hope this is informative, I didn’t have a ton of pictures for each step, I apologize.  I did them like four months ago:)  Just thought I’d share what I could!

Here are my next victims:

073071 070 068

Again, they are both so different, but still so me, and so pretty in their own unique way.  Just like each one of us right? 🙂

I can’t wait to see how they turn out.

But alas, if you don’t have the time/patience/skill level/materials to do this yourself, these are for sale!  Just comment for details.  I guess if I was a really good blogger, I would do a giveaway or something…ok, there you go!  I’m doing a giveaway!  I like to let people see my train of thought as well.  Makes me seem “real”.  haha:)

But the giveaway can’t start yet, these are actualy currently for sale on ebay, so I wouldn’t want to promise one and then have them all sell.  I will notify you on my next post if they are/which ones are still available for the giveaway, and then start it.  Keep your eyes peeled!

I will let the winner choose whichever one they would like (of the three that are finished already)…when it happens, the rules are:

You’ll need to comment on this post.

(Feel free to start commenting in the mean time as I’m sure I will have one or two still available, but just know there is a chance they won’t all be)

That’s it.  I’m not much for rules.

I will randomly generate a number, and the commenter who was that number will win!  Pretty easy, and then if you don’t win, you can still follow my blog and get awesome thrift store finds and stories a couple times a week in your e-mail!  And hopefully have some entertainment along the way:) A win-win really.

Lastly, on a totally separate subject, I have been getting compliments like woah on my latest green purse purchase for $8 (obviously from Goodwill).  It seems like everywhere I go someone tells me how much they love it.  It just proves, you can shop cheap, help out a good cause, and look good doing it!  And people will never know the difference.  It’s a great world.  A ‘good’ world if you will:)  And I will.

Peace and love and happy thrifting!

Jaime